Photographing Miniatures with Basic Equipment
Written in 2011, first posted on The Warhammer Forum, text and images all by The Dice Bag Lady. Feel free to share but please cite your source!
I know lots of people struggle with giving their wonderful paintjobs justice so here’s something I knocked up. Hopefully it’s easy to follow and doesn’t require mental expensive kit or effort, kind of an anymans guide.
1. SETTING UP
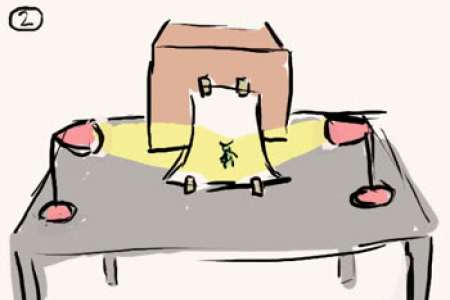
To set up, you need a flat surface, a table is preferable, the floor is just a pain. You also need a back edge, in this I have used a cardboard box but you can use anything like that, even the wall. Sometimes I make do with doing the whole thing on a chair but it’s really awkward. A3 paper is ideal, but you can use masking tape to join a few sheets of A4 together, it shouldn’t be that noticeable in the end piece, depends how good your camera is. It doesn’t need to be white, but it generally looks the most professional. Tape or blu tack the paper as shown. It’s called an “infinity curve” if you want to show off 😉 . Basically taping it like this creates a pure flat background, so don’t crease it into the join, just make sure there is flat space for the model to stand.
2. LIGHTING
This is the most important bit, and can make or break a photo.
OUTSIDE: Ideally, use natural light as it is by far the best. If you can do this outside on a good day, you’re a million steps ahead and your life is much easier. The main tip with sunlight is always have the light BEHIND YOU, not behind the model. So don’t place on a sunny windowsill unless a silhouette is really what you want.
INSIDE: A little more difficult but no problem. Assuming you’ve spent ages painting this fine model, you’ll have some kind of lamp. Choose the lightest part of your house, kitchens are generally good. Put the light on. If you have two lamps it is great, put one either side and play around a bit til you have a nice diffused light, not too close, not too far away, you want the image to be clear but not glared out. This is hard to explain, I might add further images if it gets confusing. If you have one lamp, place it kinda by the corner of the paper, facing the model about 45degrees. You may get shadows, depends if you want them or not, some will, some won’t. I don’t really mind, the only way to really get rid of them is light from different angles. Just make sure it’s not harsh or you’ll obscure some detail.
CAMERA SETTINGS:
First and Foremost
NEVER USE THE FLASH!!
It is evil, and makes even the best painted mini look pants. Stay away, it’s not your friend, turn it off! It’s usually the symbol of a lighting with a “DENIED!” circle around it
If you are outside, the default should be fine. However most cameras, and I think phones too, have a setting called WHITE BALANCE. It’s usually on auto. For outside, use the image of the sun, or if that fails, the cloud.
If you are inside, unless you have a daylight bulb, or the room is lit bright from the window (then see above), your lights will be synthetic. The option to chose here is usually the lightbulb, or “incandescent”, or sometimes the one which looks like a bar, which is “fluorescent”, for strip lights. This is a really vital thing, ever found your pictures come out really yellow, or blue? This is because the white balance is wrong, cameras aren’t really that clever and get this bit wrong a bit with their “auto” setting.
Sometimes if these are still a bit off, you can try “autocorrect” or “white balance” in photoshop or any basic image editing programme, but I won’t really go into that (unless anyone really wants to know) as it’s super easy to get right beforehand.


